I started tracking my expenses during my sophomore year in college. You see, I had money in an account, but I didn’t really know how much was in it. One night I found myself at my local grocery store buying much-needed ramen noodles and lean cuisines. I handed the cashier my card and it was declined. I gave her an awkward laugh and said “Oh that must be a mistake because I know I have money in my account.” Swipe again. Declined. As if I hadn’t endured enough embarrassment, I handed her my card a third time.
I’m sure you know what happened. I left my groceries there at the checkout lane and shamefully walked back to my car and headed straight to my computer to check my bank account balance. That’s when I saw a big fat ZERO staring straight at me.
I immediately called my mom and had that awkward moment where I had to ask for money. She made me come home that weekend and sit down with her to start tracking my expenses. I remember feeling so embarrassed when she saw just how much money I was spending on eating out and buying clothes. I sat on the floor of my childhood room next to my mom who was teaching me how to be an adult. That’s the moment when my financial journey started.
Maybe You’ve Been Here
If you have experienced that same moment when you’re handed back your declined bank card then you get it. Maybe you haven’t been in my shoes, but you know that you could be spending less and saving more. Thankfully, you can use Quicken to help track your expenses and balance your checking account each month. I’m going to walk you through the steps to set up Quicken to help you succeed financially!
Start by purchasing Quicken! It’s what I’ve been using for YEARS and Quicken allows me to always know how much money I have in my account before my bills come out on auto draft!
Set Up Your Accounts
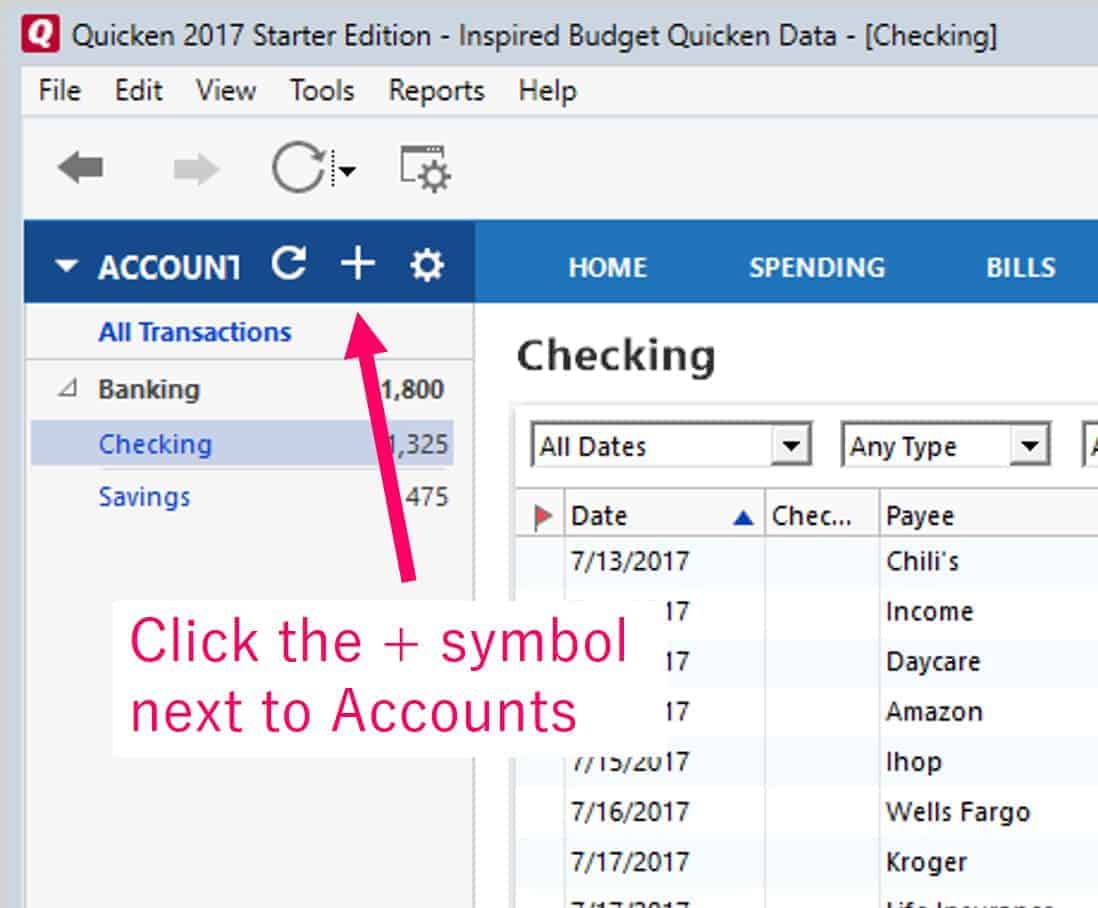
First and foremost, you need to set up your Checking and Savings accounts. To do this, click the + button next to the word “Accounts.”
Choose which account you would like to set up.
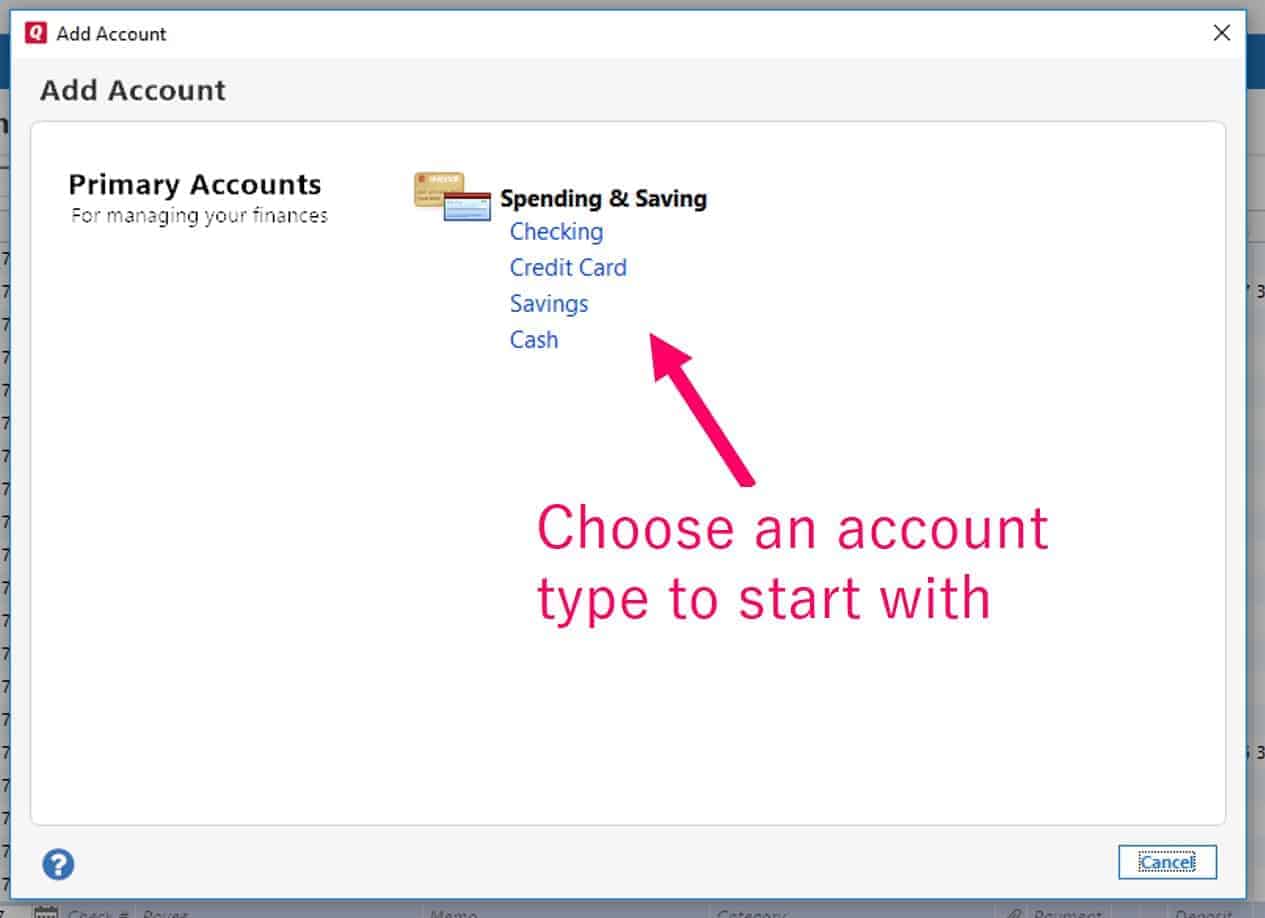
You can always go back and add another account.
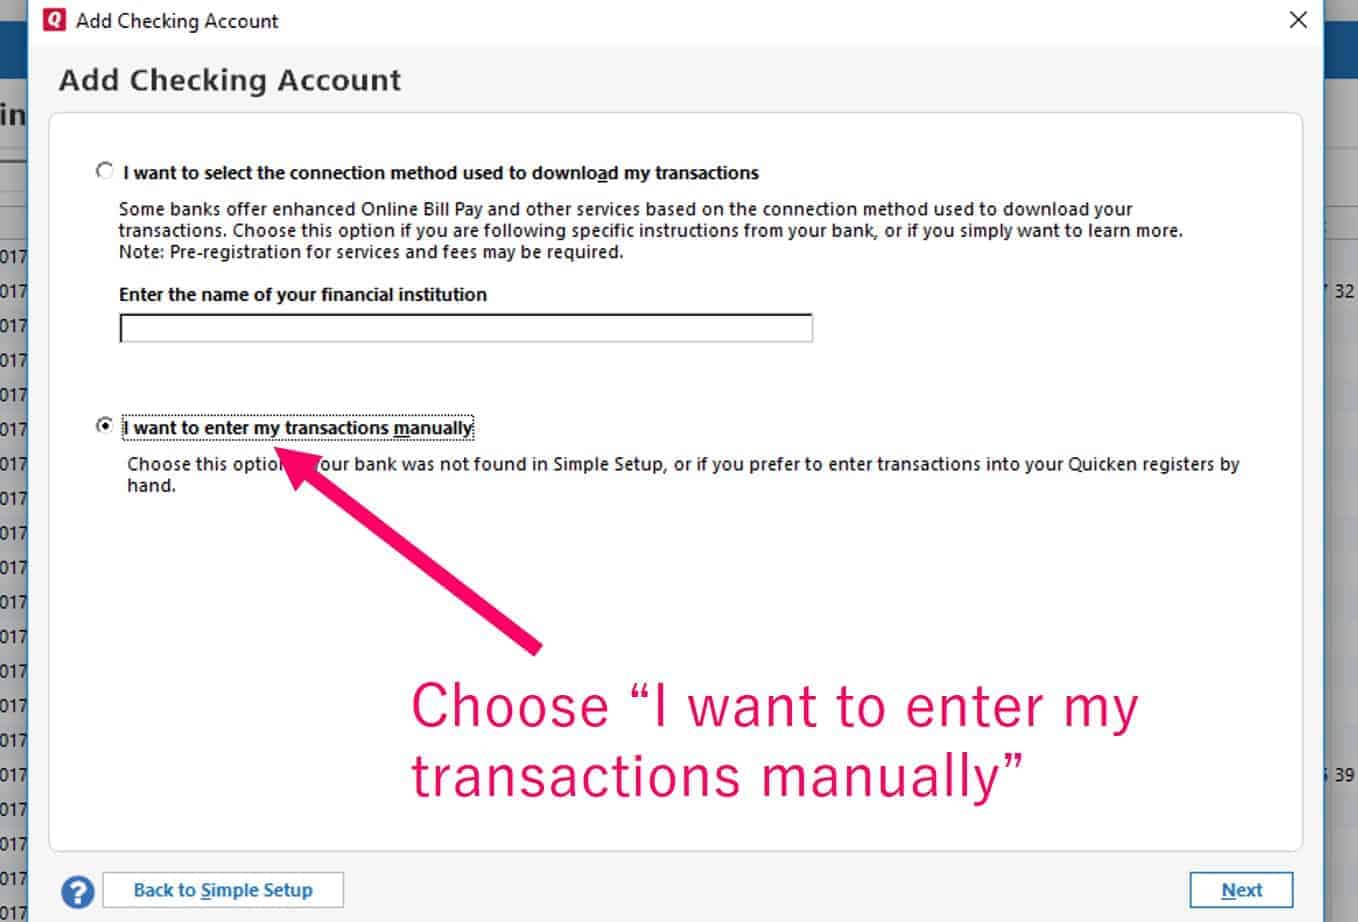
You have the option to link this account with your bank, but I prefer to manually add my transactions. My reasoning is that sometimes people don’t cash a check immediately or a transaction might take several days to withdraw from your account. I want to know exactly how much money I have at any moment. If I forgot that I wrote a check to someone then it will appear that I have more money than I actually do. It’s also a control thing. I like to be in control of what goes into Quicken. If you wish to bypass the option to connect to your bank, click the “Advanced Setup” button.
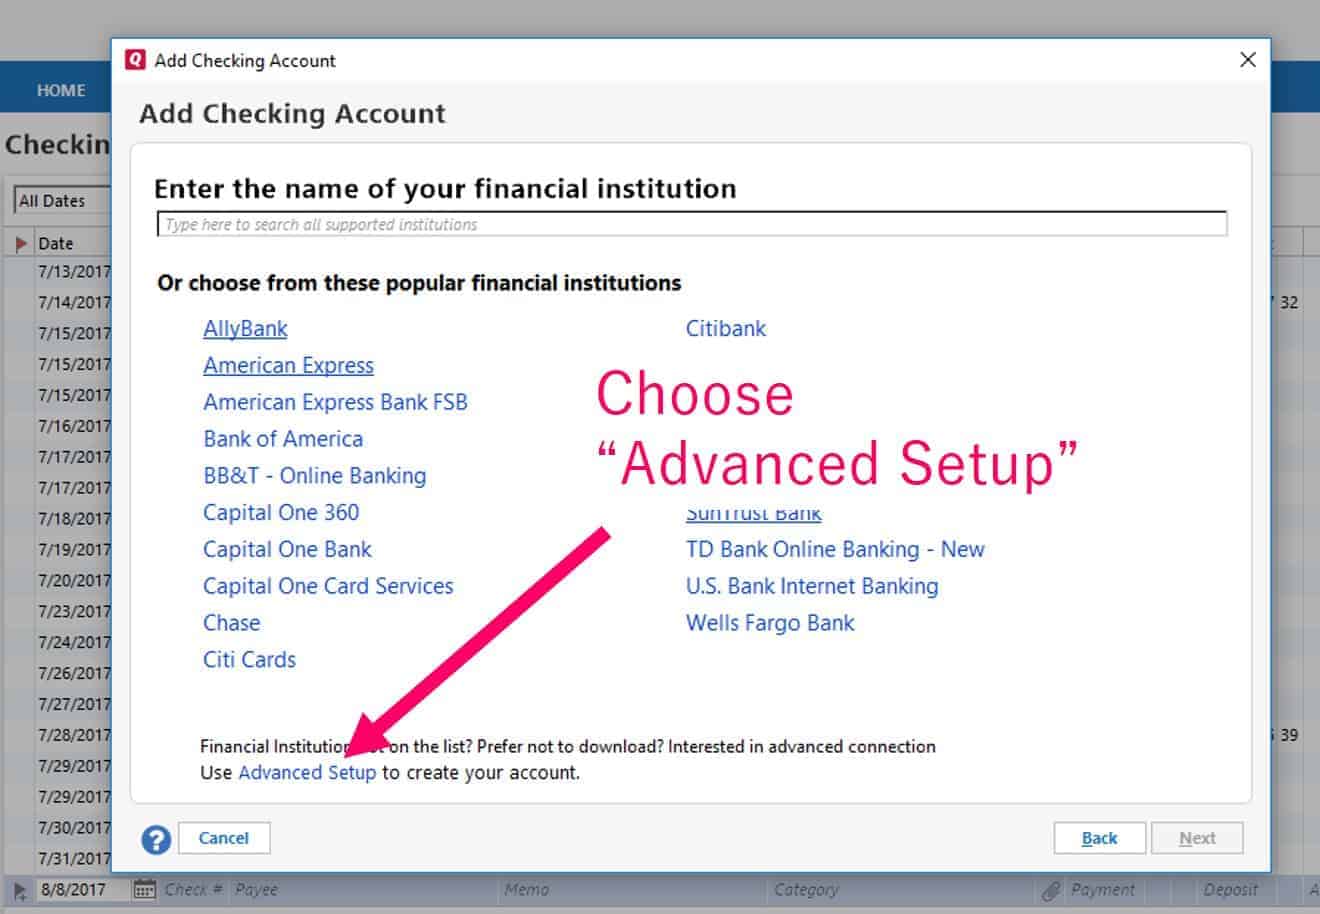
Then choose “I want to enter my transactions manually.” Give your account a name such as Chase Checking Account.
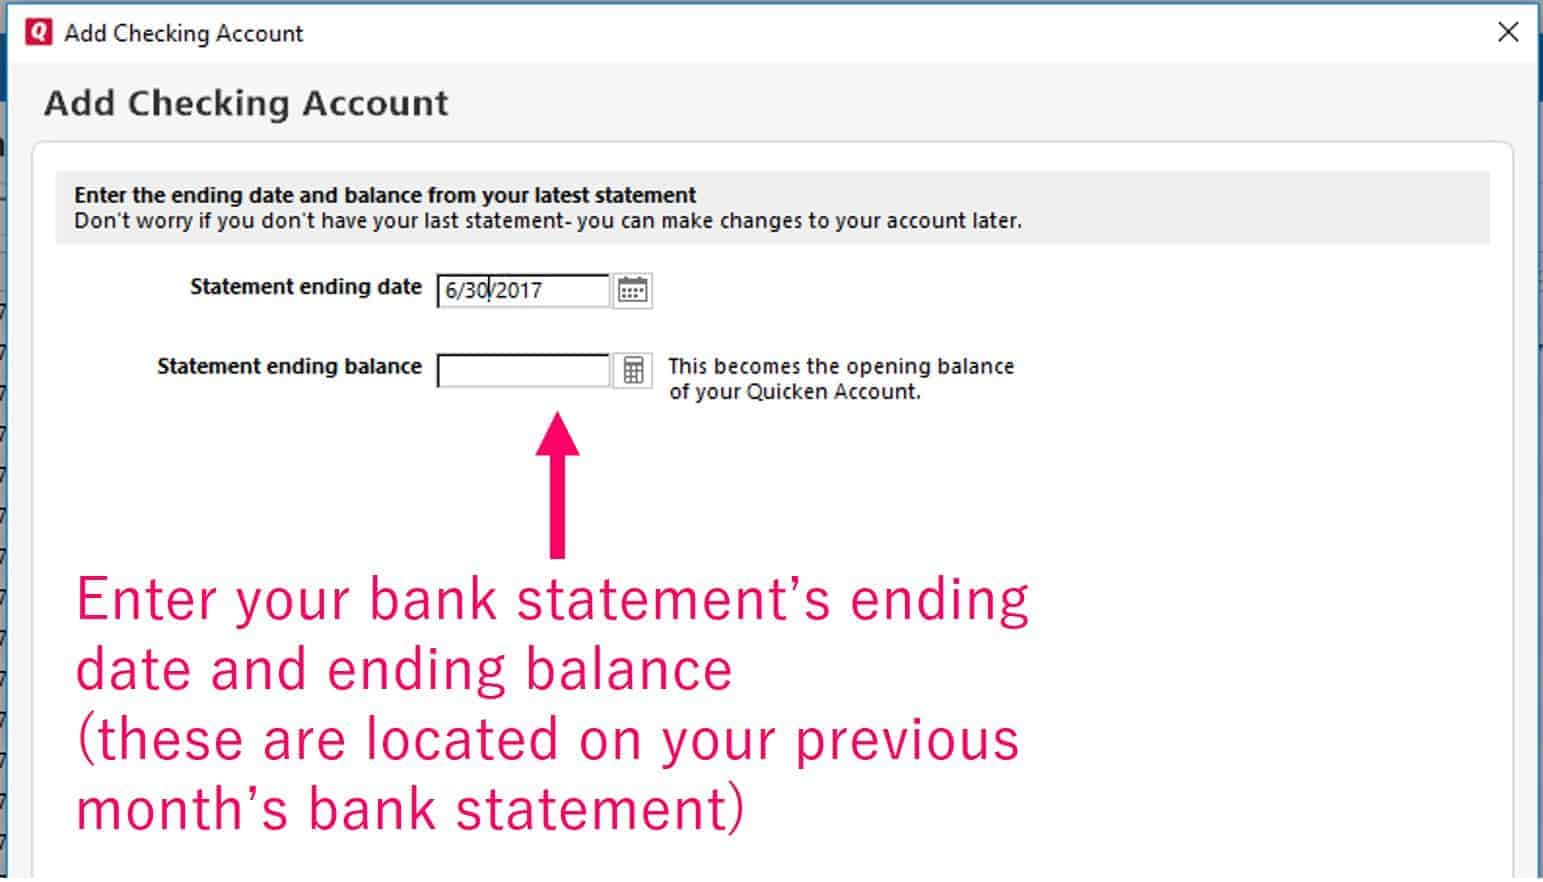
Set Your Opening Balance
Now it’s time to set your opening balance. You will want to pull up or print your last month’s bank statement. Look at the very bottom of all the transactions for the Statement Ending Date and Statement Ending Balance. This is how much you have in your account on that date. It will be your opening balance for your Quicken account.
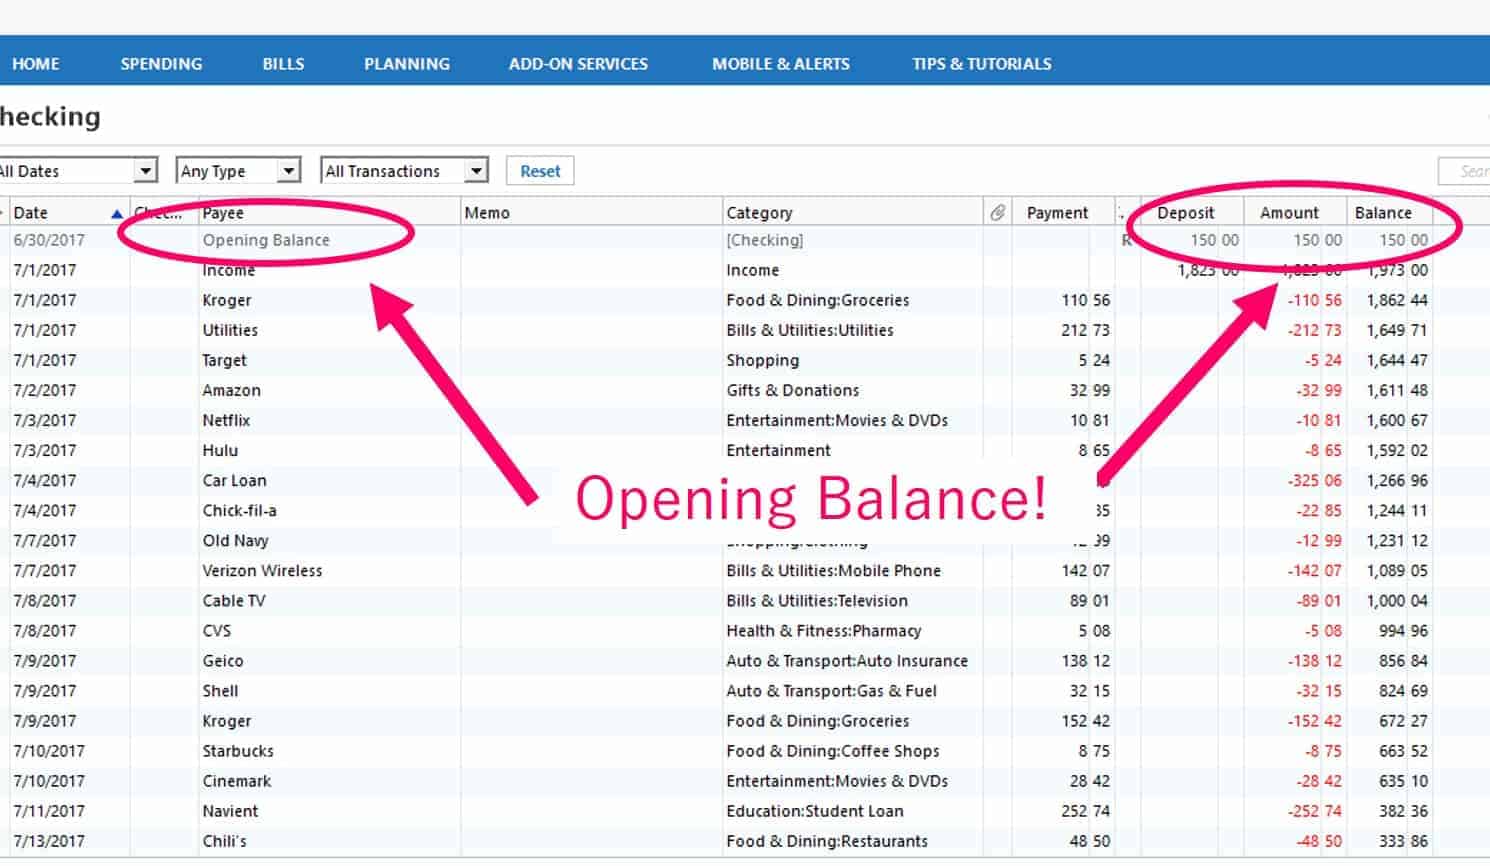
You should be left with a screen that looks like this, but unlike mine, it should not have any transactions.
Setup Categories
You’ll want to assign each expense a category. This will allow you to track your spending and see if you are overspending in certain categories. Analyzing your categories will help you better prepare a budget for the upcoming month.
To create a category, click “tools” and select “category list.”
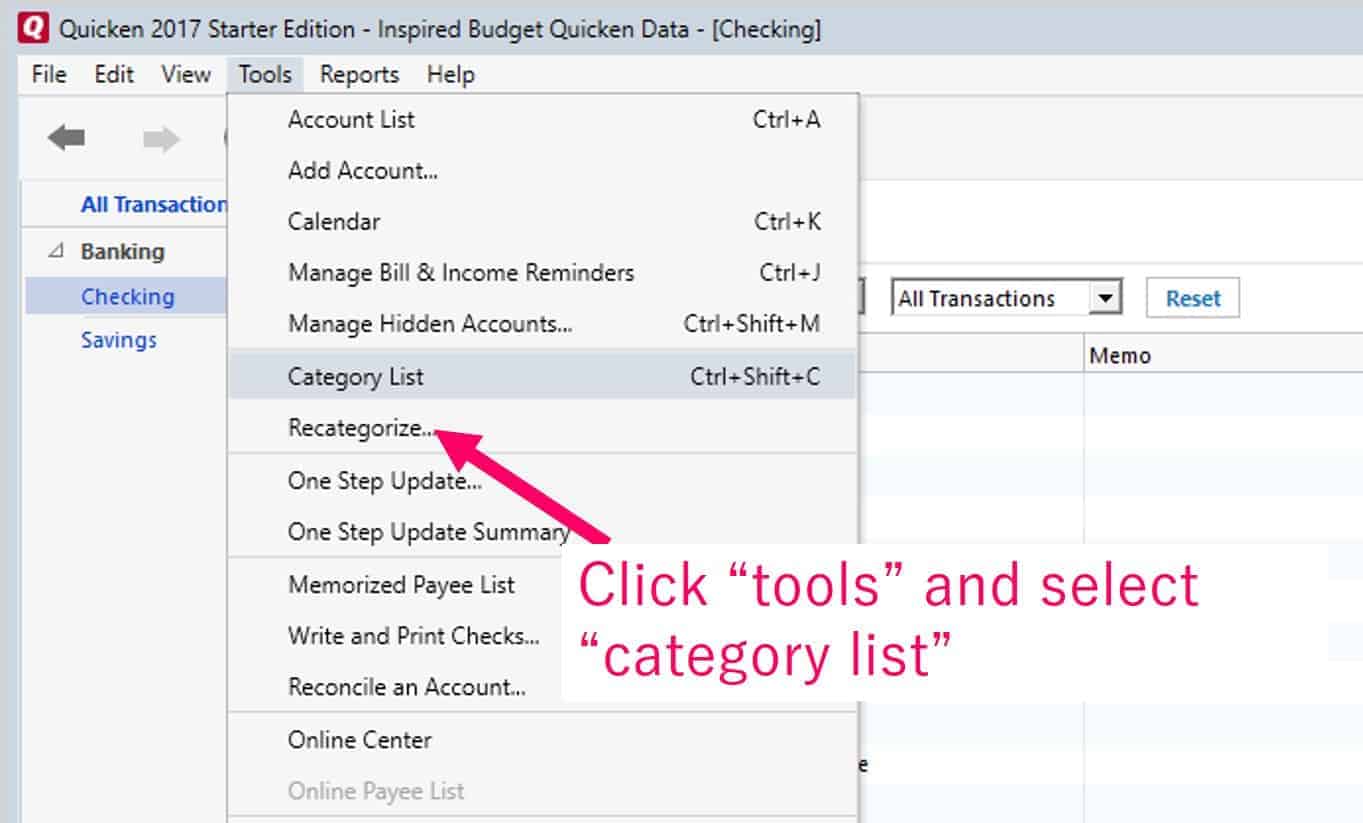
Here you can edit or add categories and subcategories. If you don’t like Quicken’s default categories, you can change them by clicking “Options” at the bottom of the box. You can also quickly add a new category by clicking “New Category.”
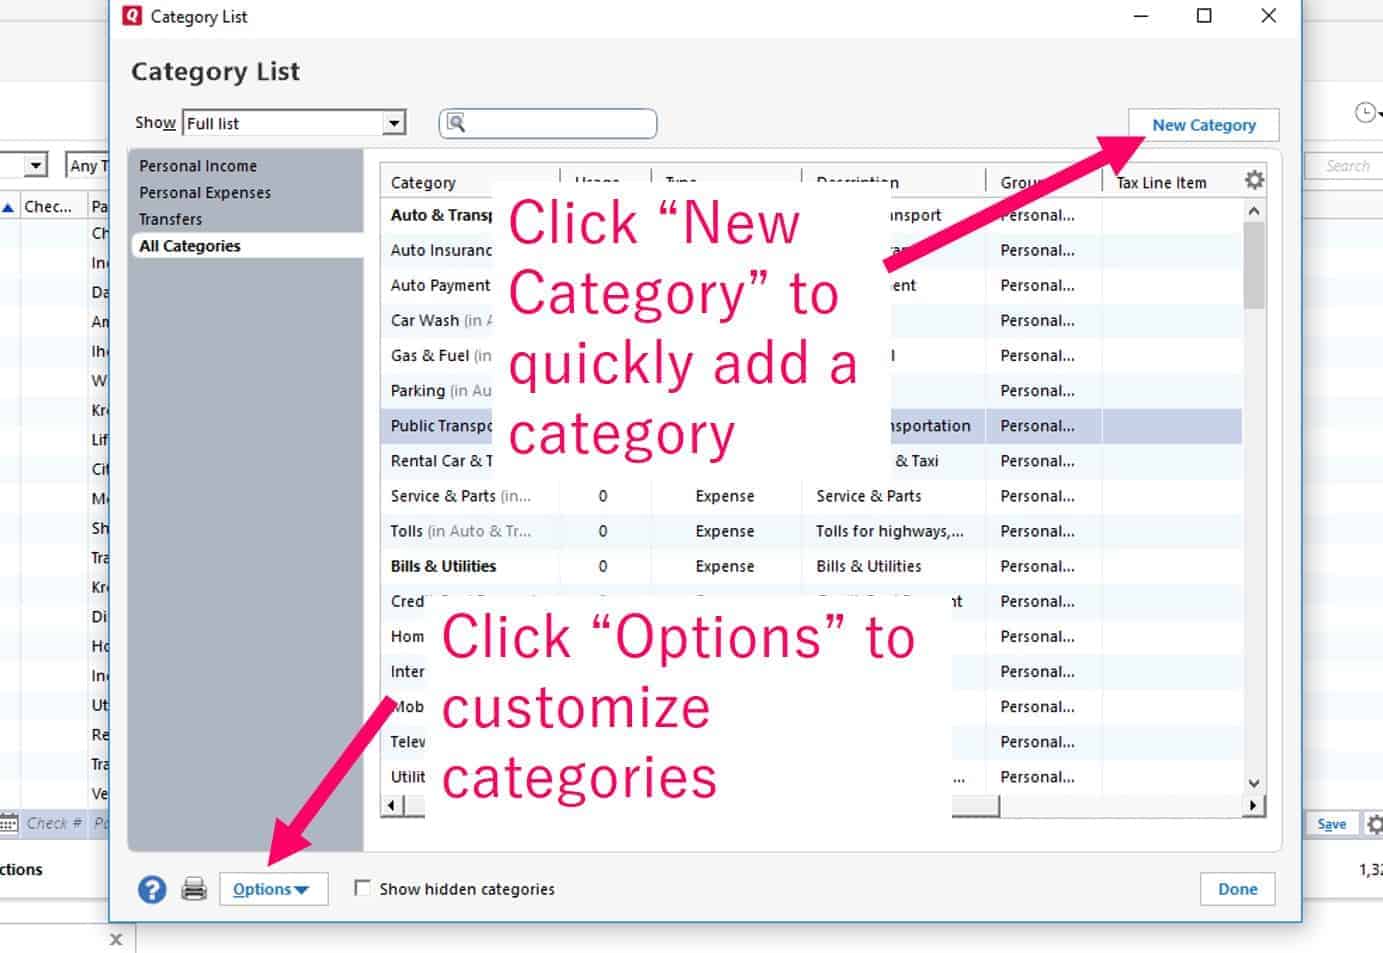
I recommend that the categories in your Quicken account match the categories in your personal budget. This makes it easier to compare your spending to the budget you set up each month.
Enter Your Expenses and Income Into Quicken
It’s time to enter your expenses into Quicken and catch you up from where you started. For instance, you can see that I started my balance on June 30th. I need to fill in all my July expenses until today’s current day. If the month just began then this will not be a big task. If the month is almost over then you get to manually enter all your expenses for that month so that your Quicken account is accurate. This is a great way to start noticing your spending habits.
To enter a transaction, fill in the date, payee, category, and payment/deposit. Try to be as specific as possible. If you need to enter income, simply put the amount in the income column.
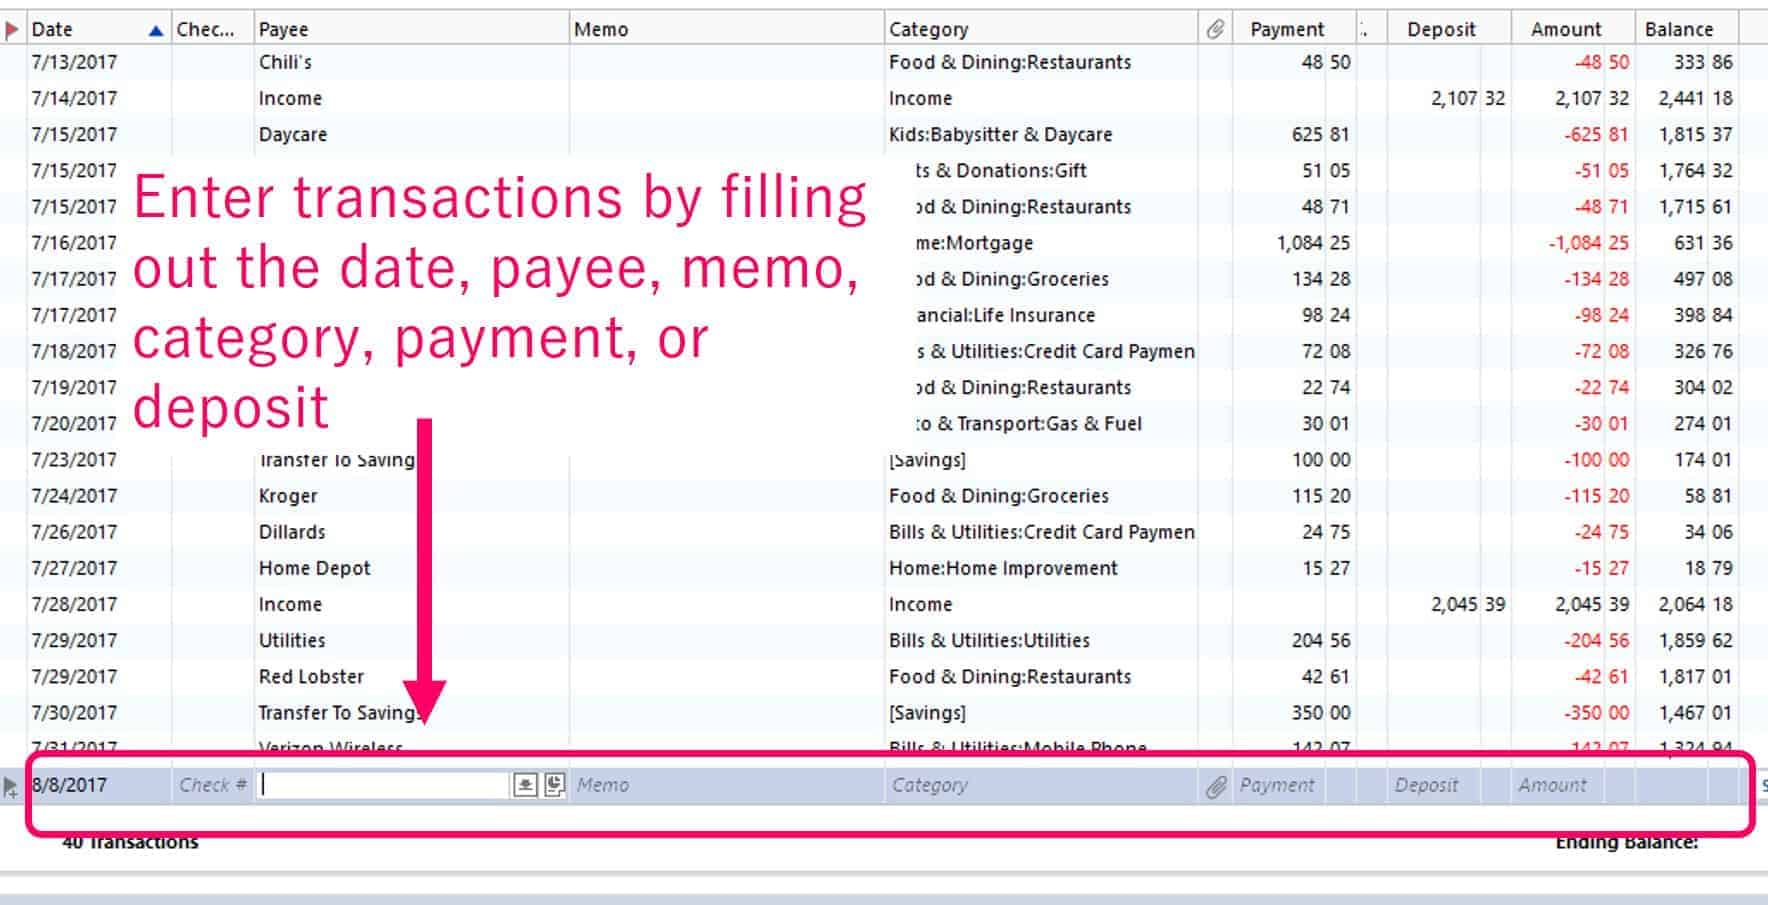
Be on the lookout for another blog post about how to balance your account and analyze your categories. As you continue to put transactions into your Quicken account, you will become more comfortable with it every day. I usually save my receipts in my wallet and then input the transactions into Quicken about every 1-2 days. I can guarantee you that if you track your money diligently, you will not find yourself standing at the checkout line of the grocery store asking the person at the register to please scan your card a third time. Instead, you’ll know where you stand financially at any given time.

